Jun 4, 2021
How to Send Money from Japan to Another Country via Japan Post and Wise (TransferWise)
For Filipinos working abroad, sending money to our love ones is very important. It’s one of the ways to show that we care even though we are far away. That’s why whenever you see a Western Union, most of the customers there are Filipinos.
On the other hand, not all cities in Japan have a Western Union--- like the city where I currently reside. I really wanted to send money back home, so I could help out my family during this pandemic, but my only option was bank transfer, which was so pricey!!!
Hence, I looked for an alternative and found Wise (formerly known as TransferWise).
What is Wise?
According to Wikipedia, “it’s is a London-based financial technology company founded in January 2011 by Estonians Kristo Käärmann and Taavet Hinrikus.” Wise can transfer money all over the world by using its website or mobile App.
Why Japan Post?
Because I’m enrolled in Japan Post, I’ll only post on how I was able to transfer money from that account.
How to Use Wise?
1. You need to register first.
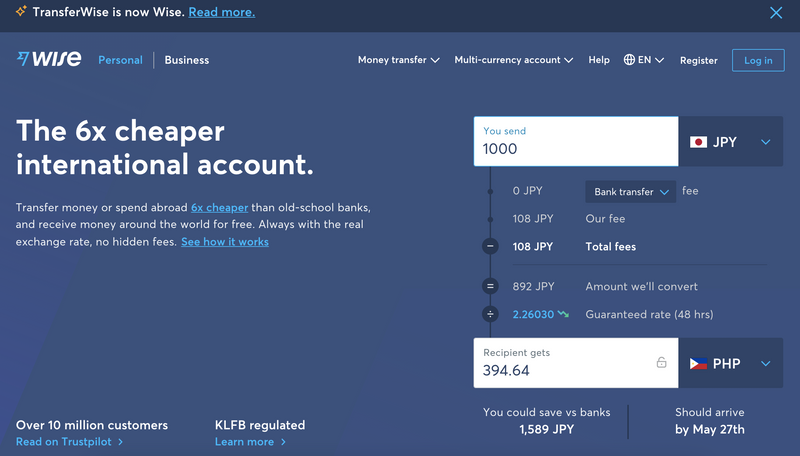
2. You will be asked how much you want to transfer. Just enter the amount and the currency you are going to use.
3. You then need to choose if you are doing a personal or business transfer. For me, I chose personal.
4. Then, just fill out your personal information.
5. After that, you need to provide the details of the recipient, including the bank account where you are going to send the money and the reason why you are transferring money.
6. When you have reviewed that all the details you provided are correct, you will then choose how you want to pay your transaction--- Debit Card or Manual Transfer.
NOTE: In this page you’ll also see how much is the conversion rate, the transaction fees (177 yen), and the estimated time when is your money going to arrive. Usually it could take a day or just hours, depending on when you paid your bank transfer. If you paid during the weekends, expect the money to arrive on Monday.
In addition, if it’s a NEW ACOUNT, it might take a bit longer because they need to verify your details in Japan.
- You will be asked to provide a clear photo of your MY NUMBER ID with your recent address.
- If you don’t have that ID, you can provide your JUMINHYO which you can get in the city hall where you reside. Take note that your JUMINHYO shouldn’t be more than 6 months old.
- You’ll be asked to take photos of your RESIDENCE ID from different side just to see thickness. (I guess this is to check if your ID is real or not.)
- You also need to write down 6 or 4 digits (sorry I couldn’t remember) in a piece of paper and take photo of it with your RESIDENCE ID.
- Don’t throw those digits yet, because you’ll also need to take a photo with it.
- Once you are done with the background check, just wait for an email confirming your details have been verified. If not, they’ll ask you more evidence. If you don’t provide them the information they need, they will cancel your transaction.
7. Since I choose MANUAL TRANSFER, I was provided the bank details of Wise in Japan. You need this information when you go to JAPAN POST.
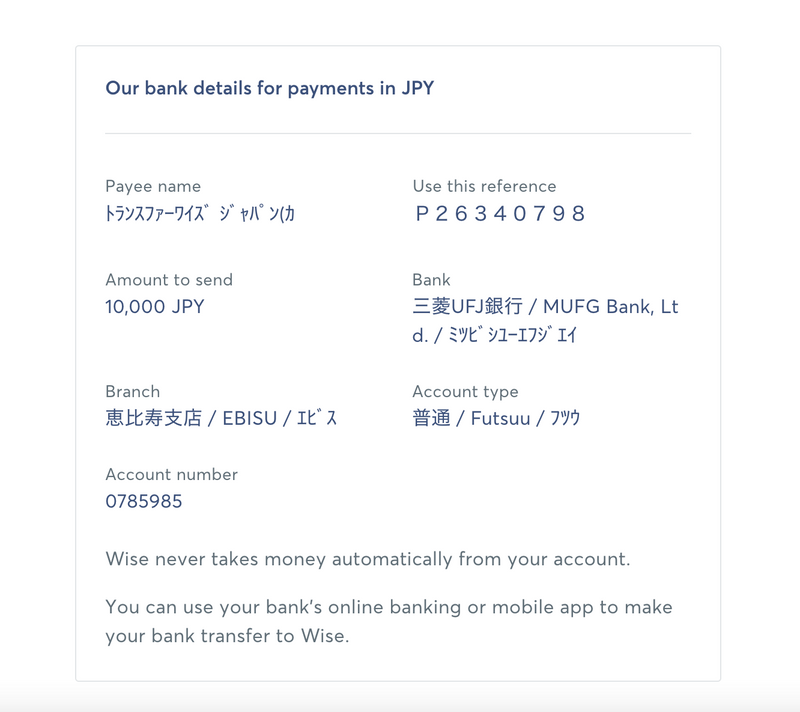
Wise's bank details
8. Click, “I’ll transfer my money later.”
9. Go to JAPAN POST to transfer the money. I’ll show it later.
10. Once you are done with the transfer, just click, “I’ve made my bank transfer.”
How to Transfer Money with Japan Post?
You could only do this by using the ATM in Japanese. It can be a bit intimidating when you can’t read Kanji, so I’ll demonstrate it here.
1. Select REMITANCE (ご送金)
2. Select REMITANCE TO ANOTHER BANK ACCOUNT ( 他行口座へのご送金 )
3. Touch the GREEN button below, NEXT ( 次へ )
4. You’ll be then asked to put in your Passbook or Cash Card
5. Enter your PIN
6. A list of Japanese banks will show up on your screen, look up for ( 三菱UFJ銀行 ) and select it.
7. You’ll see Japanese characters, select the katakana E (エ).
8. Then just press NEXT PAGE ( 次を表示).
9. Chose EBISU BRANCH (恵比寿支店).
10. You’ll see 4 choices, pick the first one which is the ORDINARY DEPOSIT ( 普通預金 ).
11. Enter the Wise account number, 0785985.
12. Enter the amount you want to send, make sure it matches the one you put on your Wise transaction form.
13. You’ll see the estimated arrival of your money and the Japan Post transaction fee, which depends on how much you’ll send. Then press the GREEN BUTTON, verification ( 確認 ).
NOTE: When I sent around 10,000 yen, I was charged 220 yen.
14. Your account name will show up, check it. If you don’t have any changes press the GREEN BUTTON or Not Going to Change ( 変更しない ).
15. Enter your phone number and push the GREEN BUTTON or verification ( 確認 ).
16. Finally, a summery of your transaction while pop on your screen. Review it and if there are no mistakes, just press the GREEN BUTTON or verification ( 確認 ).
NOTE: Take a picture of the screen, so you’ll have evidence that you made the transaction. You might need it when you encounter some anomalies.
17. Get your receipt and you are done.
Verdict
Even though it’s a little slower than Western Union, Wise’s fee is cheaper. In addition, based on my experience, they have a fantastic customer service.
I had a problem with verifying my details (completely my fault) and I transferred my money already to UFJ. However, it didn’t go to my account. I emailed them and they responded within couple of hours. They asked me to a photo of my receipt (which thank goodness I kept!) and bank details. After they confirmed I sent them my money, they transfer it back it my Japan Post account. Kudos to the person who helped me out and Wise.


0 Comments